Lesson Plan > Lesson 17 > Science
Elementary Level: How Plants Grow
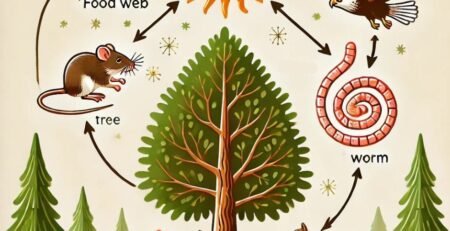
Mid Level: Ecosystems and Food Chains
High Level: The Digestive System
Elementary Level (Kinder to Grade 2)
Subject: How Plants Grow
Duration: 1-2 weeks (45-minute sessions, 2-3 times per week)
National Standards Alignment
- Next Generation Science Standards (NGSS):
- 1-LS1-1: Use materials to design a solution to a human problem by mimicking how plants use their external parts (e.g., roots for stability, leaves for growth).
- 1-LS3-1: Make observations to construct an evidence-based account that young plants are like, but not exactly like, their parents.
- Common Core State Standards (CCSS):
- CCSS.ELA-LITERACY.W.1.8: With guidance and support, recall information from experiences or gather information from provided sources to answer a question.
- CCSS.MATH.CONTENT.1.MD.A.2: Express the length of an object as a whole number of length units by laying multiple copies of a shorter object (e.g., measuring plant growth with a ruler).
Objectives
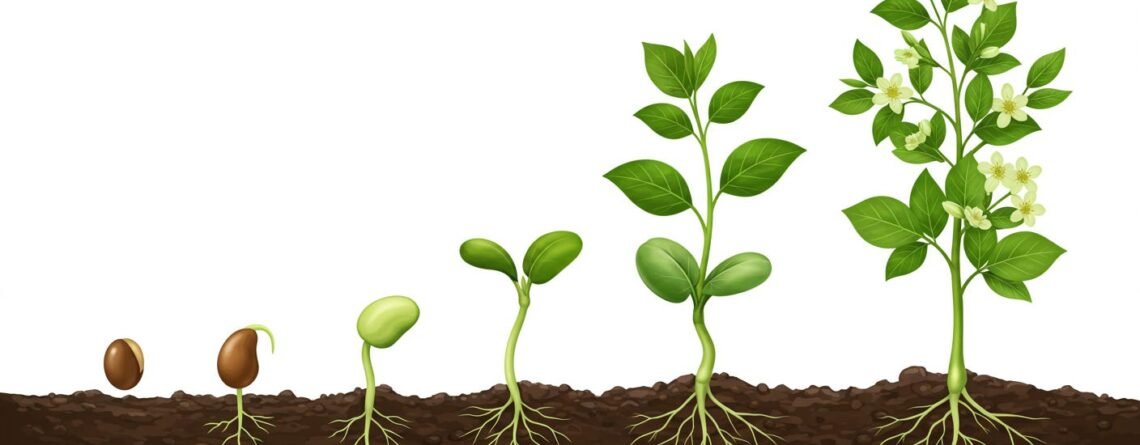
- Understand the basic stages of the plant life cycle (seed, germination, seedling, mature plant, flowering/fruiting).
- Identify the needs of plants (water, sunlight, soil, air) for growth.
- Observe and document the growth of a real plant from seed to seedling.
- Develop fine motor skills and scientific curiosity through hands-on planting and observation.
Materials
- Small pots or recycled containers (e.g., yogurt cups with drainage holes)
- Potting soil
- Fast-germinating seeds (e.g., bean, pea, or sunflower seeds)
- Watering can or spray bottle
- Ruler or measuring tape
- Crayons, markers, or pencils
- Observation journal (blank notebook or printed template)
- Access to sunlight (windowsill or outdoor space)
- Optional: Magnifying glass, picture books about plants (e.g., The Tiny Seed by Eric Carle)
Activities
Day 1: Introduction to Plants and Planting Seeds (45 minutes)
- Warm-Up (10 minutes):
- Begin with a short discussion: “What do you know about how plants grow? Where do plants come from?”
- Read a simple plant-related story or show a diagram of the plant life cycle (hand-drawn or printed).
- Direct Instruction (10 minutes):
- Explain the plant life cycle in simple terms:
- Seed: A tiny “sleeping” plant.
- Germination: The seed wakes up with water and warmth.
- Seedling: A baby plant with its first leaves.
- Mature Plant: Grows tall and strong.
- Flowering/Fruiting: Makes flowers or food for new seeds.
- Discuss plant needs: water, sunlight, soil, air.
- Explain the plant life cycle in simple terms:
- Hands-On Activity (20 minutes):
- Plant seeds together:
- Fill pots with soil, make a small hole (about 1 inch deep), place 2-3 seeds in each, and cover with soil.
- Gently water the soil until moist (not soaked).
- Label pots with the child’s name and date.
- Place pots in a sunny spot.
- Plant seeds together:
- Wrap-Up (5 minutes):
- Ask: “What do you think will happen to our seeds?” Record predictions in the observation journal.
- Ask: “What do you think will happen to our seeds?” Record predictions in the observation journal.
Days 2-7+: Observing Growth (15-20 minutes daily or every other day)
- Observation (10 minutes):
- Check the pots daily for changes (sprouting, height, leaves).
- Measure any growth with a ruler and record in the journal (e.g., “The plant is 2 inches tall today!”).
- Draw what they see (e.g., a tiny sprout or first leaves).
- Discussion (5-10 minutes):
- Ask questions: “Why do you think the plant grew today? What does it need to keep growing?”
- Relate observations to the life cycle stages introduced on Day 1.
- Care Routine:
- Water the plants as needed (teach the child to check if soil feels dry).
Final Day: Reflection and Review (45 minutes)
- Review (15 minutes):
- Look back at the journal: “How has your plant changed since we planted it?”
- Revisit the life cycle and match their plant’s progress to the stages.
- Creative Activity (20 minutes):
- Draw or craft a picture of the full plant life cycle using their observations (e.g., seed to seedling to imagined mature plant).
- Draw or craft a picture of the full plant life cycle using their observations (e.g., seed to seedling to imagined mature plant).
- Wrap-Up (10 minutes):
- Discuss: “What did you learn about how plants grow? What surprised you?”
- Optional: Plan to keep caring for the plant or transplant it outside.
Assessment
- Informal Observation: Watch for participation, curiosity, and ability to describe plant needs and stages.
- Journal Check: Look for drawings and notes showing understanding of growth changes (e.g., “It got taller!” or “It has two leaves now”).
- Verbal Questions: Ask the child to explain the life cycle or plant needs in their own words.
Extensions
- Compare different seeds (e.g., plant beans and sunflowers to see differences in growth speed).
- Explore outside: Find plants in different life cycle stages in your yard or neighborhood.
- Watch a time-lapse video of plant growth online for a visual reinforcement.
Mid Level (Grade 3 to 5)
Subject: Ecosystems and Food Chains
Duration: 1-2 weeks (45-minute sessions, 2-3 times per week)
National Standards Alignment
Next Generation Science Standards (NGSS):
- 4-LS1-1: Construct an argument that plants and animals have internal and external structures that function to support survival, growth, behavior, and reproduction.
- 4-LS1-2: Use a model to describe that animals receive different types of information through their senses, process the information in their brain, and respond to the information in different ways (e.g., how animals in a food chain depend on each other).
Common Core State Standards (CCSS):
- CCSS.ELA-LITERACY.W.4.2: Write informative/explanatory texts to examine a topic and convey ideas and information clearly.
- CCSS.MATH.CONTENT.4.MD.A.1: Solve problems involving measurement and conversion of measurements (e.g., measuring lengths of materials for the food chain model).
Objectives
- Understand the components of an ecosystem, focusing on producers, consumers, and decomposers.
- Identify and classify organisms within a food chain based on their roles.
- Build a model to demonstrate how energy flows through a food chain.
- Develop critical thinking and creativity through analyzing relationships in ecosystems.
Materials
- Construction paper or cardstock (various colors)
- Scissors, glue, and markers
- String or yarn (to connect food chain elements)
- Images or drawings of organisms (e.g., sun, grass, rabbit, fox, mushroom) – can be printed or hand-drawn
- A large poster board or flat surface for the model
- Notebook or paper for written reflections
- Optional: Access to a library book or online resource about ecosystems (e.g., Who Eats What? by Patricia Lauber)
Activities
Day 1: Introduction to Ecosystems and Roles (45 minutes)
- Warm-Up (10 minutes):
- Ask: “What do you think happens to energy in nature? Where does it start?”
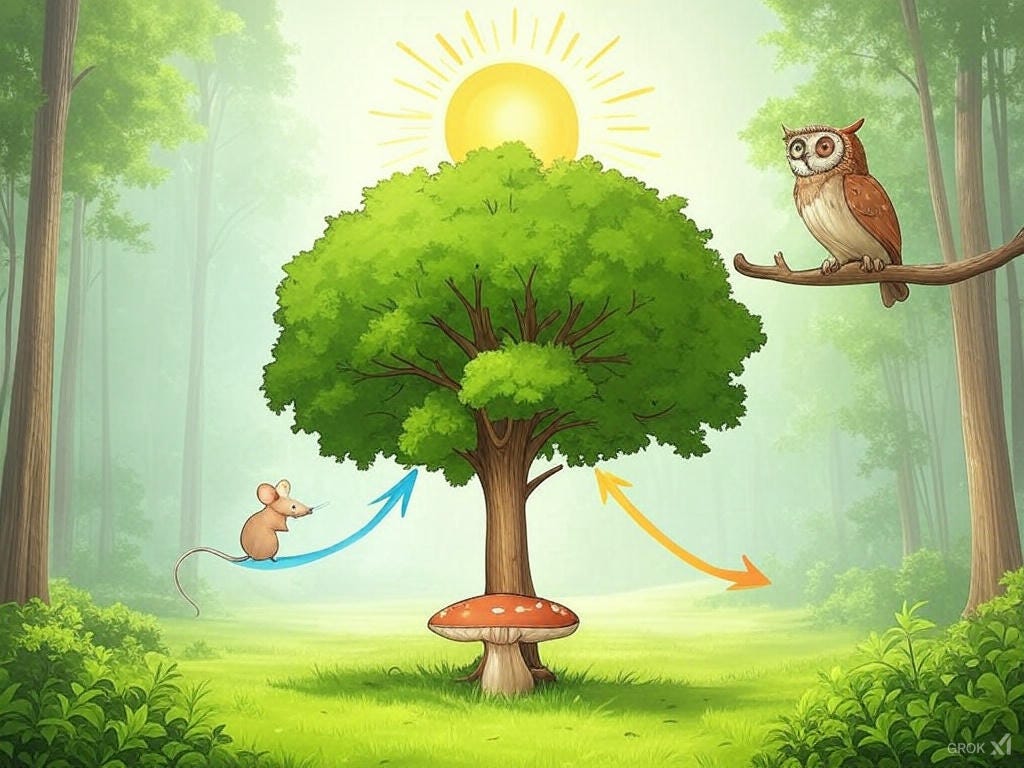
- Show a simple ecosystem picture (e.g., a forest or backyard) and discuss what lives there.
- Direct Instruction (15 minutes):
- Explain key terms:
- Ecosystem: A community of living things interacting with their environment.
- Producers: Plants that make their own food using sunlight (e.g., grass, trees).
- Consumers: Animals that eat plants or other animals (e.g., rabbits, foxes).
- Decomposers: Organisms that break down dead material (e.g., fungi, worms).
- Introduce a basic food chain: Sun → Grass → Rabbit → Fox → Decomposers.
- Explain key terms:
- Discussion (10 minutes):
- Ask: “What would happen if one part of the chain disappeared?” (e.g., no grass = no rabbits).
- Wrap-Up (10 minutes):
- Assign a quick task: “Write or draw one producer, one consumer, and one decomposer you know.”
Day 2: Exploring Food Chains (45 minutes)
- Review (10 minutes):
- Recap Day 1: “Who remembers what a producer does? A consumer? A decomposer?”
- Hands-On Activity: Planning the Model (25 minutes):
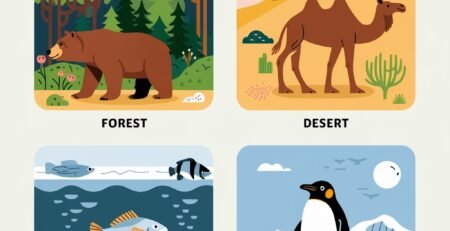
- Choose a specific ecosystem (e.g., forest, pond, desert) with the child.
- List 5-7 organisms in that ecosystem (e.g., for a forest: sun, tree, mouse, owl, mushroom).
- Sketch a rough food chain on paper, labeling each organism’s role (producer, primary consumer, etc.).
- Wrap-Up (10 minutes):
- Discuss: “How does energy move from the sun to the top of your chain?”
Day 3: Building the Food Chain Model (45 minutes)
- Model Creation (35 minutes):
- Cut out shapes or draw organisms on construction paper (e.g., a yellow circle for the sun, green leaves for plants, animals in realistic colors).
- Arrange them on the poster board in a chain, connecting each with yarn or arrows to show energy flow.
- Label each organism with its name and role (e.g., “Tree – Producer”).
- Reflection (10 minutes):
- Ask: “What did you learn by building this? Does anything surprised you?”
- Write a short paragraph in the notebook: “My food chain shows how energy moves from ___ to ___.”
Day 4: Reflection and Extension (45 minutes)
- Review (15 minutes):
- Look at the model: “Tell me about your food chain. What happens if one part is missing?”
- Extension Activity (20 minutes):
- Expand the model into a food web: Add one or two more organisms (e.g., a bird eating the mouse and seeds).
- Draw new connections with yarn or arrows.
- Wrap-Up (10 minutes):
- Discuss: “How is a food web different from a food chain? Why do ecosystems need all these parts?”
Assessment
- Informal Observation: Note the child’s ability to explain roles and energy flow during discussions.
- Model Check: Evaluate the food chain model for accuracy (correct roles, logical flow).
- Written Reflection: Review the notebook entry for clarity and understanding of concepts.
Extensions
- Research a local ecosystem (e.g., your backyard or a nearby park) and create a second model.
- Watch a short documentary clip about food chains (e.g., on YouTube or PBS).
- Play a game: “Food Chain Tag,” where the child acts out roles (e.g., chasing as a consumer, standing still as a producer).
High Level (Grade 6 to 8)
Subject: The Digestive System
Duration: 1-2 weeks (45-minute sessions, 2-3 times per week)
National Standards Alignment
Next Generation Science Standards (NGSS):
- MS-LS1-3: Use argument supported by evidence for how the body is a system of interacting subsystems composed of groups of cells.
- MS-LS1-7: Develop a model to describe how food is rearranged through chemical reactions forming new molecules that support growth and/or release energy as this matter moves through an organism.
Common Core State Standards (CCSS):
- CCSS.ELA-LITERACY.RST.6-8.3: Follow precisely a multistep procedure when carrying out experiments, taking measurements, or performing technical tasks.
- CCSS.ELA-LITERACY.WHST.6-8.2: Write informative/explanatory texts to examine a topic and convey ideas, concepts, and information through the selection, organization, and analysis of relevant content.
Objectives
- Identify the major organs of the digestive system and their functions.
- Understand the process of digestion, from ingestion to nutrient absorption and waste elimination.
- Model the digestive process using household items to simulate mechanical and chemical digestion.
- Develop scientific reasoning and communication skills through observation and explanation.
Materials
- For Instruction:
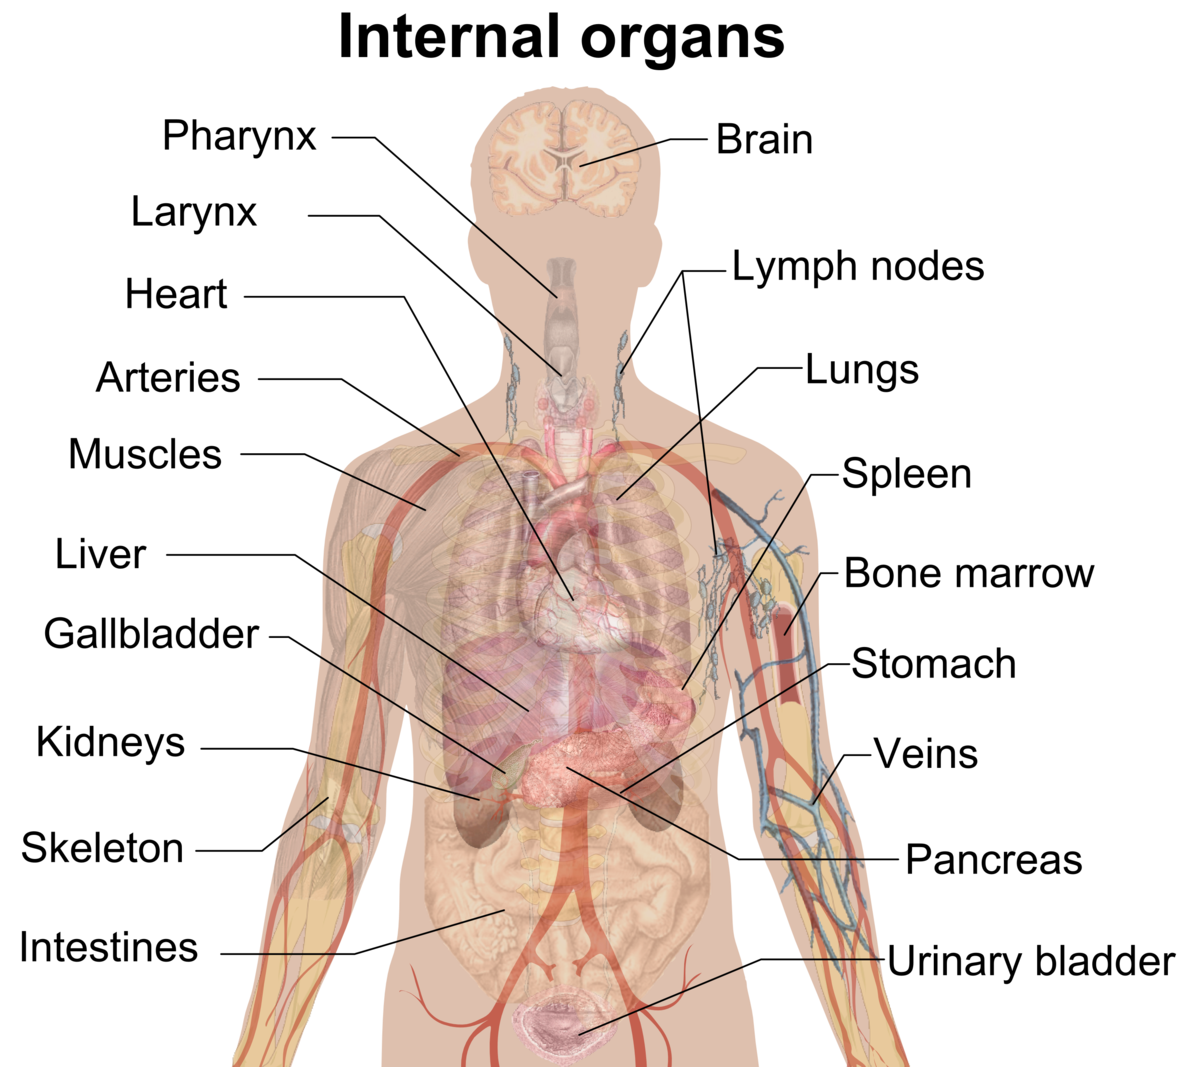
- Diagram of the digestive system (printed or hand-drawn)
- Notebook or paper for notes and reflections
- For Activity:
- Ziploc bag (represents stomach)
- Bread or crackers (food)
- Water (saliva)
- Small amount of orange juice or vinegar (stomach acid)
- Nylon stocking or cheesecloth (small intestine)
- Funnel (esophagus)
- Bowl (large intestine)
- Scissors, measuring cup, and spoon
- Optional: Red food coloring (to simulate blood absorption)
Activities
Day 1: Introduction to the Digestive System (45 minutes)
- Warm-Up (10 minutes):
- Ask: “What happens to food after you eat it? Where does it go?”
- Share a relatable example (e.g., “Think about eating a sandwich—how does it become energy?”).
- Direct Instruction (20 minutes):
- Introduce the digestive system:
- Mouth: Breaks food mechanically (teeth) and chemically (saliva).
- Esophagus: Moves food to the stomach.
- Stomach: Churns food and adds acid to break it down.
- Small Intestine: Absorbs nutrients into the blood.
- Large Intestine: Removes water and forms waste.
- Use a diagram to point out each organ and its role.
- Introduce the digestive system:
- Discussion (10 minutes):
- Ask: “Why do you think digestion takes so long? What’s the most important part?”
- Assign: “Write down 3 things you learned about digestion today.”
4. Wrap-Up (5 minutes):
Day 2: Modeling the Digestive Process (45 minutes)
- Review (10 minutes):
- Recap Day 1: “What are the main organs we talked about? What does the stomach do?”
- Hands-On Activity: Digestion Simulation (30 minutes):
- Set up a station with materials and guide the child through these steps:
- Mouth: Tear bread into small pieces (teeth) and mix with a splash of water (saliva) in a bowl.
- Esophagus: Use a funnel to pour the mixture into a Ziploc bag (stomach).
- Stomach: Add a tablespoon of orange juice or vinegar (acid), seal the bag, and squish it for 1-2 minutes (churning).
- Small Intestine: Cut a corner of the bag and squeeze the mush into a nylon stocking over a bowl; let liquid drip through (nutrients absorbed), leaving solids behind.
- Large Intestine: Squeeze the stocking gently into the bowl to mimic water removal; leftover mush is “waste.”
- Discuss each step: “What’s happening here? How is this like your body?”
- Set up a station with materials and guide the child through these steps:
- Wrap-Up (5 minutes):
- Quick clean-up and note: “What did this model show you about digestion?”
Day 3: Reflection and Analysis (45 minutes)
- Review (15 minutes):
- Revisit the model: “Let’s go through each step—what did the orange juice do? The stocking?”
- Compare to the real digestive system using the diagram.
- Written Activity (20 minutes):
- Write a short explanation: “Describe the digestive process in your own words, using our model as an example.”
- Wrap-Up (10 minutes):
- Discuss: “What surprised you about digestion? How does this help your body every day?”
Assessment
- Informal Observation: Check for engagement and ability to connect model steps to real digestion.
- Written Work: Review the Day 1 notes and Day 3 explanation for accuracy and clarity.
- Verbal Explanation: Ask the child to explain the process using the model as a prop.
Extensions
- Research enzymes (e.g., amylase in saliva, pepsin in stomach) and add a step to the model (e.g., a drop of soda for enzymes).
- Explore a digestive disorder (e.g., lactose intolerance) and discuss its effects.
- Dissect a simple food label to see how nutrients (carbs, proteins) are digested.


LEAVE A COMMENT